I wanted to try the "Ferment Dough" function on the Mayer MMBM12 breadmaker today, so I chose a bakery bun recipe that would require manual shaping and baking in a normal oven.
This is one of our favourites, Luncheon Meat Bun. Basically the dough recipe is a sweet dough recipe that is used for most commonly found items in Chinese bakery shops. The fillings can vary from luncheon meat to sausage to char siew to curry, whatever is your preference. Thus I wanted to try this recipe and see if it is a keeper, so that I do not have to store so many different recipes.
I made only half a recipe as my Breadmaker's capacity is only 750g (a quick calculation put the ingredients at >900g). The steps were standard: mix all dough ingredients until no longer tacky->proof 30 mins -->punch back -->2nd proofing 30 mins-->shape -->final proofing -->brush with eggwash -->bake for 10-15 mins at 200°C.
Original Recipe from “港面包, 港味道” - 邱勇灵 编著
面团
高筋面粉 450 克
糖 112 克
酵母 7 克
牛油/猪油 42 克
温水 3/4杯
鸡蛋1只
牛奶1/4 杯
面粉改良剂 4 克
1杯为250毫升, 鸡蛋一只约为50克。
馅料
午餐肉16片
装饰
蛋液适量 (扫面)
马苏里拉 (Mozzarella)芝士碎适量
Showing posts with label baking. Show all posts
Showing posts with label baking. Show all posts
30 August 2017
25 August 2017
Unboxing Mayer Breadmaker MMBM12
Hubby told me there was a Mayer atrium sale near his workplace and snapped a pic of the Mayer Breadmaker (MMBM12) on sale. It was going for about 50% off (compared to online sources and other retailers like Parisilk), so we jumped on the offer and bought it.
Y went with me to purchase it and she was so excited about the new purchase that she actually helped me carry the box (4.5kg) home from our basement carpark!
Naturally, Y continued to harrass me to open and bake bread immediately, so we did just that.
Opening the box, we found the operating manual/instruction book and a glove(for protecting your hand when removing the inner bread barrel from the machine body). Inside the bread barrel, there was the stirrer, a measuring cup, and a dual measuring spoon.

24 August 2017
Gula Melaka Ogura Cake
This is a birthday cake for my sister. My family prefer light, airy sponge/chiffon cakes compared to butter/cream/fondant cakes, so I tried to make an Ogura cake.
Thus, for the actual birthday cake (I needed a 8 inch square cake to be enough for my family of ~20 pax), I used the following amounts: (text in red my own adjustments)
Original Recipe from BakingMom80, but I did some modifications as the original recipe was for a 6 inch square cake. A day earlier, I followed the recipe to a T, but used a 5x8inch rectangular tin instead of a 6inch square. Perhaps it was the larger eggs I used, but the batter overflowed the cake tin. On hindsight, I should have poured the excess batter to make cupcakes.
Thus, for the actual birthday cake (I needed a 8 inch square cake to be enough for my family of ~20 pax), I used the following amounts: (text in red my own adjustments)
(A)
5+1 egg yolk (I used large 60g eggs)
1 whole egg
1/4 tsp salt
60g canola oil
70g+14g gula melaka - chopped into smaller pieces
20g+4g milk
75g+15g plain flour
(B)
5+1 egg whites
40g castor sugar
1/4tsp cream of tartar
Steps
- Grease and lined 8 inch baking tin. Prepare larger tin with boiling water (and a cloth to prevent baking tin from moving) for waterbath. Preheat oven to 150 degree Celsius.
- Warm milk and add to the chopped gula melaka. Mix until dissolved. Strain to remove larger particles.
- In a large mixing bowl, whisk all ingredients in (A) except for plain flour, until light and fluffy. Set aside.
- In a separate, grease-free mixing bowl, beat egg whites until foamy. Add in cream of tartar, continue beating and add in sugar in 3 separate batches. Beat until you attain firm peaks.
- Fold the meringue into the yolk mixture in 3 batches.
- Pour batter into the cake tin slowly, letting large air pockets burst while pouring (this prevents the formation of large air pockets in the baked product). Smooth the surface of the batter with a spatula.
- Drop the prepared cake tin from a height of about 10cm from tabletop, to release any more air bubbles.
- Place the cake tin in the waterbath (I place a cloth between the waterbath tray and the cake tin to prevent any movement, which may happen if the waterbath level is too high)
- Bake in the middle rack of oven at 150 degree Celsius for 70mins.
- Check doneness using a cake tester/satay stick. Once done, invert onto cooling rack for 5minutes, then unmould and remove baking paper before cooling upright.

Purple Sweet Potato Muffins
I was just finishing up the Ogura cake for my sister, and wanted to make use of the oven (since it took so long to heat up and cool down anyway!). Googled and found a recipe for sweet potato muffins, which were easy enough to whip up (I had less than an hour before I had to pick Y from school then)
Sweet Potato muffins (makes 12)
1 Cup Self-raising flour
1 Cup sugar (I used 3/4C)
1 tsp cinnamon powder
1/2 egg
1 Cup mashed sweet potato flesh
1/2 Cup oil
Steps
- Line a 12-hole muffin pan with liners, if using. Preheat oven to 375F/190C.
- Sift the dry ingredients (flour, sugar, cinnamon)
- Beat the egg til pale, then add the sweet potato flesh and oil. Mix well.
- Mix the dry ingredients into the wet ingredients, until just moistened.
- Bake in preheated oven for 15-18 minutes.
Note: for some reason, the baked purple sweet potato turns green, so my sisters and nephews were a bit hesitant to eat when they saw green spots dotting the muffin (looking exactly like mouldy food) I read later that it was due to a reaction with baking soda/powder.

15 August 2017
Unboxing Kenwood compact oven toaster MO280
We were at Robinsons Raffles City checking out the sale promotions when I saw this on sale. I had been tempted to replace the current Philips toaster (which only toasts sliced bread and warms pastries atop the toaster), with a small toaster oven. I wanted to be able to make simple puff pastry items and pizzas for breakfast/lunch without having to use my built-in oven or airfryer (which blows all the shredded cheese everywhere when in use)
I liked this model as it has a crumb door at the base to clean crumbs/messes. Function-wise, it has temperature control and timer. I can also choose function (whether to have only top heating, or both top and bottom heating)
Hubby had some vouchers to use on hand, so we decided to buy this for $49.90.
I am looking forward to more grilled breakfast items!
 |
| Top (from left): Slide-in wire tray; instructions manuals; tray/dish handle (hidden below manual) ; cooking dish. |
21 December 2016
Mango yogurt chiffon cake trial
My nephew's birthday is coming up and he requested a mango flavoured cake. I found this recipe online and decided to try it out a day before baking his actual birthday cake.
The recipe was small enough for my 15cm tube pan (based on inner diameter at the top), and fitted the pan exactly (okay, it rose about 1cm above the rims of the pan during baking, but fell during cooling) you can see the picture below.

Taste was light and fluffy just as chiffon should be. The cake was a tall 10cm high (hear my squeal!) The taste of mango was hardly noticeable (make mental note to sub the mango yogurt with fresh mango puree & plain yogurt).
My daughter polished off two slices (almost a quarter) of the cake at one go. And our family of three had the cake for breakfast the next day. Texture was still as good the day after baking.

Recipe for 18cm tube pan (I used a 15cm tube pan)
Egg yolks -3
Caster sugar - 25g
Oil -35g
Mango yogurt drink - 42.5ml
Cake flour -50g
Baking powder - 1/4 tsp
Salt - 1/8 tsp
Caster sugar - 25g
Oil -35g
Mango yogurt drink - 42.5ml
Cake flour -50g
Baking powder - 1/4 tsp
Salt - 1/8 tsp
Meringue
Egg whites - 3
Cream of tartar - 1/8 tsp
Caster sugar - 35g
Egg whites - 3
Cream of tartar - 1/8 tsp
Caster sugar - 35g
Bake at 160 degree Celsius for 30 mins.
Recipe from http://thedomesticgoddesswannabe.com/2015/06/mango-yogurt-chiffon-cake/
15 September 2016
Karissa's birthday cake 2016: strawberry yogurt-vanilla chiffon
My niece's birthday was coming up in Sept, so I decided to try some new chiffon recipes based on a book "Creative Baking: Chiffon Cakes" by Susanne Ng & Tan Phay Shing.
The main (pink) chiffon is strawberry yogurt-vanilla chiffon. The surrounding "belt" was made from strips cut from pandan chiffon sheet cake. Words and hearts from sheet cake.

01 August 2016
Strawberry Hearts Cheesecake for sister's birthday August 2016
Baked a strawberry hearts cheesecake for my sister's birthday

16 September 2015


01 September 2015
German cookies for Teachers Day presents 2015
Hands getting itchy again, so I decided to be ambitious and bake some homemade cookies for YX's teachers. Decided on the german cookies that I had been thinking of making since Chinese New Year, but never got round to baking. I had to bake earlier as her centre is having a scheduled holiday the day before the MOE school holiday on Friday.
I used the recipe shared in the Facebook group, Bakingscorner, and the original recipe is from bakingtaitai. I followed the ingredients list accordingly, and made two batches, one original and one green tea matcha flavour.
My experience:
- I found the dough to be very soft and wet. It was suggested that if the dough was too soft to handle, we could chill it. I thought that would also help while waiting for the oven to be ready, so I placed a tray of shaped dough in the fridge. They ended up having tiny beads of condensation on them, which were visible after baking.
- Also, based on the recommendation size of 8g per piece, my cookies came out being quite big (after expanding in the baking process). For subsequent trays, I reduced the size to 6g each for a more manageable bite-sized portion. You can see the difference in size in the second photo.
- The picture below shows the matcha flavoured cookies sticking more to the baking paper. Perhaps I did not bake them long enough. (I used the lower end 12 min baking time as I was worried they would be burnt and take on a brownish hue.)

After the cookies cooled sufficiently, I packed them (VERY CAREFULLY) into disposable plastic boxes I had bought from Phoon Huat. I alternated the flavours by layer, and laid each layer on the only doileys I had on hand (5.5 inch round ones leftover from CNY baking). They fitted the boxes perfectly, as you can see in the picture below.

I ended up having quite a lot extras since I made 2 batches. But I was worried about saving them until Sunday for her church school teachers, and next monday for her music class teacher, so I decided to just let her have all the boxes for her teachers in LifeJourniz.
Original Recipe Source is http://bakingtaitai.blogspot.sg/2014/06/german-butter-cookies.html.
28 August 2015
Japanese Strawberry Shortcake (Valerie Chian's recipe)
What you need:
For the cake:
145g cake flour
15g corn flour
1 egg
5 egg yolks, whisk slightly with fork
150g unsalted butter / corn oil
65g fresh milk
5 egg whites
100g caster sugar
1/4 tsp salt
250g fresh strawberries
170g fresh raspberries
Preheat oven to 160degC
Grease and line 8"square pan
Heat butter/oil and milk till melted and combined, do not boil
Off heat and add in sifted flour, mix with wooden spatula
Transfer to bigger bowl, add eggs, continue to mix til smooth
In another bowl, beat egg whites on low speed til frothy, add salt and followed by sugar in 3 additions, beat til soft peak
Pour 1/3 of egg whites mixture into egg/butter mixture, fold in gently, pour the rest and continue to mix gently
Pour batter into pan, bake au bain marie for approximately 45minutes or til skewer comes out clean
Remove from oven, after 5 minutes trasnfer to cooling rack
------------------------------------
For the stabilized whipped cream:
2 tsp gelatin powder
8 tsp cold water
2 cups whipping cream, cold
1/2 cup icing sugar
1 tsp vanilla
Chill mixing bowl and beaters in the freezer for 10 minutes
Put cold water in small saucepan, sprinkle gelatin over surface of the water and let stand for 5 minutes
Place saucepan over low heat, stir continuously with wooden spoon just until the gelatin dissolves. Remove the saucepan from the heat and cool to room temperature
Remove mixing bowl and beaters from freezer. In the mixing bowl, combine whipping cream, sugar and vanilla and whip till slightly thickened. While beating slowly, gradually pour the gelatin into the whipped cream mixture
Then whip the mixture at high speed till stiff
------------------------------------
For sugar syrup:
Optional:
1/4 cup sugar
1/4 cup water
1 tsp kirsch gel
Combine in a small saucepan, bring to boil, stir in sugar til dissolved
Let cool
To assemble:
Reserve some strawberries for decoration (the pretty ones!)
Dice the balance, mix with a little sugar, set aside
Reserve some raspberries too for decoration and halve the balance
Cut cooled cake into 3 parts
Place 1 layer cut side up, brush with syrup, spread cream, arrange diced strawberries and spread again with cream
Repeat with the 2nd layer (but this time with raspberries), put the 3rd layer cake on top, brush with syrup and layer thinly with cream
Chill for 30 minutes at least
Spread another layer of cream on top of the cake and chill for another hour, garnish with berries
------------------------------------
Clear Fruit Glaze
Ingredients
1/2 cup sugar
1 cup water or fruit juice
2 tbsp. cornstarch
2 tbsp. corn syrup
Bring sugar to a boil with 1/2 of the water or juice. Dissolve cornstarch in 1/2 water or juice and add to the sugar mixture. Cook, stirring until mixture thickens and clears. Stir in corn syrup. Bring to a boil then remove from heat. Cool before using.
27 August 2015
Seeta's birthday cake 2015
We had an early birthday celebration for my 2nd sister during our weekly dinner gathering at my parents' house. I took the chance to have fun and try to bake something new/different.
I had tried this particular Strawberry Shortcake recipe before, but the first attempt last year was not too ideal, as I was new to bain-marie method (which is a fancy term for waterbath) then. Unfortunately, for this round, the baking result was also not perfected yet. I was supposed to get a nice soft and beautifully risen round cake, but it deflated unevenly after cooling and was sloping on one side.
Thankfully, my Wilton small cake leveler (view it on Wilton online store here) had already arrived through hubby's consolidated Amazon purchases. It was such a lifesaver and easy-to-use tool. I wonder why it took me so many years to decide to get this. I always ended with a backache after baking and slicing and decorating cakes in my kitchen with a flimsy adaptation of a cake turntable. Not to mention uneven and sloping cake layers.
Strawberry shortcake recipe. Filled with strawberries. Topped with mandarin oranges, strawberries, peach and blueberries.

The cake base recipe is from a church-mate Valerie.

20 August 2015
My first Ogura cake 20Aug 2015
I came across this type of cake, named "ogura". Apparently it is similar to a chiffon in that the rising of the cake is based on beaten egg foam.
I tried a simple recipe for pandan flavoured cake and it tasted okay. The aesthetics were, however, much lacking. Other than the split top, I spied quite a few pockets of unmixed egg white foam. Texture was lovely, though. It was soft and spongy, and not as dry as traditional chiffon.
I tried a simple recipe for pandan flavoured cake and it tasted okay. The aesthetics were, however, much lacking. Other than the split top, I spied quite a few pockets of unmixed egg white foam. Texture was lovely, though. It was soft and spongy, and not as dry as traditional chiffon.


17 June 2015
Home Bakes - Hershey's Perfect Choc Chip Cookies
My niece wanted to prepare some cookies to gift her school CCA seniors, and so we tried a recipe taken off hershey's website.
We experimented with the size stated in the instructions ("rounded teaspoons" of dough) as well as the easier-but-larger size using my small ice cream scoop.
Verdict (which I could predict anyway): the smaller cookies tended to be more crisp, and larger ones had softer centres. At least that was the case on the actual day of baking. We will have to wait a few days to see if the flavour and texture changes after some days of storage.

04 June 2015
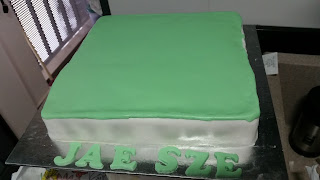
Family birthday-JS's cake - Disney princesses
I was put off preparing buttercream and/or fondant cakes for a while as my family was not too keen on the taste and high butter/sugar content of these decorations. But as I re-started my baking habit in May, I started to hanker after those beautifully decorated cakes again. I remembered that I had once bought a set of plastic Disney princess 3D cake toppers at YX's insistence some years back, only to realise that I had not put that expensive purchase to good use yet.
My niece (JS) birthday was coming up soon in mid June, so I whatsapped my sister to ask what the little gal preferred. Apparently her current favourites were Frozen, Ben and Holly, Peppa Pig. I had made a Peppa Pig cake before, and JS would be having a Frozen-themed cake for celebrations in her childcare, so I decided to use the 3D cake toppers and try my hand at fondant again.
I baked the sponge cake layers using a sponge cake premix (the Prima brand 'Optima' flour) on Tuesday. On Wed, I whipped up half a batch of Mousselline Buttercream (recipe from 'The Cake Bible') to fill and cover the sponge layers. I was deciding between this and the sweeter / more-likely-to-crust normal buttercream, and eventually decided on this as the temperatures were soaring these days (34 deg Celsius in the afternoons when I'm doing baking/ decorating). I remembered that fondant cakes weren't supposed to be refrigerated so I needed an icing that could hold up at room temperature.

(Top: baked 2 pieces of 8x5inch sponge cakes.
Bottom: I wanted a square cake, so I split one of the cakes and joined together.
And filled and frosted together)

***
COVERING WITH FONDANT

(Top: sides of cake covered with store-bought white fondant. Top of cake covered with green fondant which I coloured using Wilton's gel -blue and yellow. Looks like I need to work on joining the seams, which I had hurriedly pinched together while the buttercream was 'melting' underneath
Bottom: Green buttercream leaves to cover the ugly seams)

***
ADDING FLOWERS AND "TREES"
With the "defective" areas settled, it was time to add the frills. I placed the toppers and estimated the space that would be available for the other 'garden/flower' decorations.


21 April 2015
Chocolate Chip Cookies
Another bake to finish up my stash of ingredients..... chocolate chip cookies, in search of the taste mimicking Famous Amos-style. This time the recipe is from a baking group on Facebook. Recipe from http://bakingscorner.blogspot.sg/2014/10/famous-amos-cookies-by-esther-chong.html.

I reduced the sugar to 150g(total), but it still turned out too sweet for my liking. And I'm not sure if it is because I didn't let the butters thaw sufficiently, the dough spread more than I expected. It was a bit tiring to spoon the dough on the tray teaspoon-by-teaspoon, but the final product size was just nice (bite-sized).
Fat die meeeeeeeeeeee......
14 April 2015
Chocolate Lover's Angel Food Cake (14 April 2015)
Chocolate Angel Food Cake (recipe from "The Cake Bible" by Rose Levy Beranbaum)

First time making angel food cake (which doesn't contain oil/butter/egg yolks). I wanted to use leftover egg whites from previous bakes.
Taste Test: I found it too sweet despite choosing a chocolate recipe in a bid to temper the sweetness level.
Appearance: The height was not as desired (it was supposed to rise above the cake tin while baking, but mine didn't), but still rose a decent 4 inches. And despite letting the cake cool down in the tin upside-down until it was completely cool, I still found some moistness/condensation at the bottom of the cake (which is the top in this picture). Not sure if it was the cocoa powder used, or because I was trying not to fold in too much/too long, the appearance of the cake is speckled. Guess I need more practice...
Subscribe to:
Posts (Atom)